

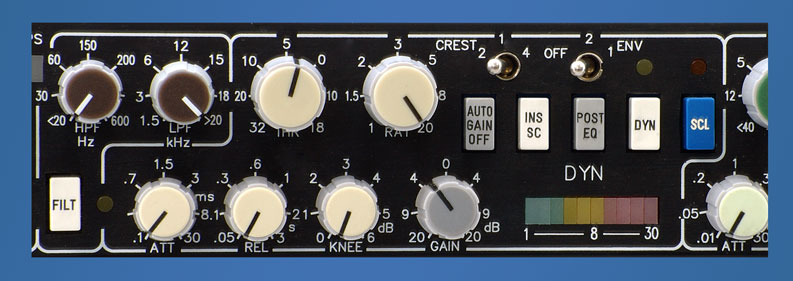
| Channel Strip ToolKit Compressor The compressor is a full featured unit that allows full control of all functions with extensive possibilities for the complex dynamic treatment of all program types. In addition to the variable controls for threshold, ratio, attack, release, and gain there are some very special functions, Crest and Envelope, that make huge loudness gain and effective, low distortion bass compression possible. All add together make the ToolKit Compressor an universal tool for any kind of dynamic treatment. The Toolkit Compressor is a feed forward controlled system that uses a high performance VCA, brand THAT to control the level of the audio path. The ToolKit Compressor is also available as TM112 ToolMod Pro Audio Module |
 |
| Home | Processing | Mic-Pre | Compressor | Noise-Gate | Equalizer | Limiter |
|
The character of the rectifier, which is actually an RMS converter that is combined with a very fast peak detection circuit can be modified by the 3-position CREST switch. In position 1 it works as a fast peak detector while position 4 selects a moderate RMS conversion. Position 2 selects a well-selected compromise between the two worlds and offers a characteristic of the rectifier that avoids the disadvantages of both pure principles. Actually, setting 2 selects a very fast RMS conversion that, on our opinion, is the best choice for many applications that require dynamic treatment. With appropriate settings of the time controls, threshold, ratio, and knee, it is possible to achieve more than 10 dB of loudness gain without an increase in level and without negative side effects. The compressed signal is just louder but sounds still natural. The Envelope control is a useful helper to find a better solution for the distortion versus pumping problem. As soon as the release time is fast enough for pump free operation, low frequency distortion is possible due to the fact that the compressor modifies the wave form of the low frequency signal with such setting. Envelope does two things at a time. The release time is modified by the frequency of the input signal in a way, that a high level, low frequency signal increases the release time for a very short period of time. This part of the entire function works just as you would manually increase the release time a little as soon as a low frequency signal is treated. Of course, it is not possible to do this manually. You will always be too slow and too late. However, the envelope system does not have such problems. In addition there is a filter stage in the side chain that reduces the low frequency range in a special way that is not a simple high-pass filter but a frequency response that is optimized for this purpose. This combination results in a much better treatment of bass signals. The Toolkit compressor has a three-position Envelope switch. Position 1 and 2 of the switch determine different amounts of release modifications and low frequency reduction, while the off posisiton disables the circuit. The standard controls, Threshold, Ratio, Attack, and Release have more than sufficient control ranges to make any setting possible. The regulation charateristics are optimized by the '12 o'clock' principle, which means that you have a good basic setting if you start with all pots set to the center position before you start optimizing the setting for the particular program material. The range of the threshold is from + 18 dB to -32 dB; the 0 dB posittion is internally calibrated. The ratio control covers the entire range from 1:1, which actually means that the compressor is off, to 20:1, which is limit operation. The setting of the Attack Time is very important, since it determines the sound performance of the unit more than anything else. Of course, we assume that you already have appropriate settings of the other controls before you start to figure out what you can do with the attack control. The range is from 0.1 ms, which is very fast, to 30 ms, which actually means that the reaction time of the compressor is so slow that there is no compression of transients anymore. The range from approximately 0.5 ms to 8 ms is mostly used with real world settings. Leaving the other controls unchanged, different attack times in that range will modify the tonal result significantly, if the release time is fast enough. If Crest is switched to RMS Mode, the minimum attack time is determined by the integration time of the RMS converter and not by the setting of the attack pot alone. With Crest 4, setting the attack time all to the left results in an attack time of approx. 2 ms. The Release control determines the compromise between fast and pump-free recovery of the level and low frequency distortion that is the biggest problem of any analogue compression. The control range of the ToolKit compressor's relase time is from 50 ms to 3s. Of course, you will get a totally distorted signal if you set the release that fast, but if you compress a signal that does not contain high level low frequencies, you can really use such fast settings. This is the case with many vocals or instruments. However, if you want to be on the save side as far as the release time is concerned, start with a setting of 0.6 seconds. The Soft Knee pot changes the ratio around the threshold point. Setting this control all to the left disables the soft knee function. With this setting, the transition from the unregulated state with levels below threshold to the regulated state above threshold is hard. Increasing the setting of the knee control makes this transition smoother. Actually, a setting all to the right expands the transition range to 6 dB. Within this range, there is a smooth transition from the linear part of the curve to the compression rate that is determined by the ratio control. Actually, the soft knee does not modify the sound performance of the compressor considerably but it makes possible to increase the compression by several dB's. There is no general rule for the use of this feature. It just depends on the program material, the setting of the other controls and your desired result if the knee function is more or less useful. In any case, ratio settings less than 2 reduce the effect of the soft knee control considerably. In addition to the auto gain system there is a normal Gain pot with a range of +/- 20 dB. You will need this manual gain control as soon as you use an external fi lter in the side-chain insert, since the auto gain circuit cannot work precisely when the level at the rectifier input is different from the level at the input of the compressor. This is always the case with external treatments of the side-chain signal. In addition to this application you may want to modify the gain independently. Autogain |
|

PRO AUDIO :
|
AUDIO MODULES :
|
| SURROUND SOUND |
| MIXING CONSOLES |
| Where to buy | |||
| Download | |||
| Reference List | |||
| Audio Studios | |||
| Links | |||
| Link to us | |||
Imprint
|
| Stereo linking The ToolKit compressor does not have stereo linking facilities for a simple reason; it makes no sense. Even if you link two compressors you will not have a stereo compressor. All the settings in both coupled units have to be exactly trimmed to the same values before it makes sense to couple a pair of compressor. To do this with the necessary precision you would need a test oscillator and a level meter. Therefore the result of such a stereo link will be a compressor that has the same gain reduction in both channels but reacts to the signals of both channels differently, and this is not very helpful. However, there are two possible ways. The best way is that you purchase a ToolMod 212, which is the stereo version of the ToolKit compressor as ToolMod device. Way number two costs no additional money and is possible with the ToolKit and a short TRS cable but it is a poor compromize. Just connect the two side-chain insert outputs of the two channel strips and switch the side-chain insert on in both channels. The output impedance of the side chain output is so high that it is possible to parallel several outputs. This way produces a mono signal on both side-chain inserts. If you match the settings of both compressors precisely you can come close to a real stereo compressor. The only additional effect might be that the auto gain does not work precisely anymore, but you can use the gain control for compensation easily. We do not recommend that you choose this way; however, its up to you to give it a try. By the way, in the same way you can also link noise- gates. The principle is the same. |
Setting the threshold to -10 dB and the ratio to 2:1 reduces the level above threshold to half the dB value. In clearer words, an input signal of 0 dB with threshold at -10 dB and ratio 2:1 causes 5 dB of gain reduction and the output signal is -5 dB. The auto gain circuit must add this 5 dB of gain to compensate the loss of this setting. Sounds simple, but, like always, there are some problems that have to be considered. Problem no. 1 is quite easy to solve. If the input signal is a lot higher than 0 dB, auto gain should not bring up this level again. Doing this would not be a real problem with small ratio settings; however limiting a signal would not be possible anymore. The solution is simple. Auto gain starts working only below 0 dB threshold. Any higher setting brings the level down and leaves the gain reduction unchanged. Problem two is not so simple to solve. The above calculation is only correct if the attack time is really fast, which means that the output has no unregulated peaks that increase the level above the calculated value. However, this is not the case with real compressor settings. Just the settings with longer attack times produce the best tonal results. Therefore, it makes no sense to ignore this problem and leave it as it is or reduce the auto gain in a way that it roughly fits. The only way to solve this problem is to include the attack setting into the calculation of the auto gain value. This is exactly what the Toolkit auto gain circuit does. There is a final error that cannot be compensated since it depends on the program material. A signal that has many peaks produces more difference in gain with different attack settings than a signal that is very constant. We cannot compensate this difference perfectly; however it is possible to find a very good approximation that results in a difference of less than 3 dB for all possible settings and different program structures. Since no one changes settings in such an extreme way and no one uses different program material with the same setting, the 3 dB error is a theoretical value. With small corrections the error is negligible. With fast attack settings the auto gain error is the range of less than 0.5 dB. However, if you are not used to the auto gain system you might be confused when you set the threshold, since there is no drop in level as soon as the compressor starts working. The AUTO GAIN OFF switch allows to make these settings without compensation. Of course, you can also use this function if you prefer to set the gain manually.