
| HOME | V700 PRO AUDIO | CLOSE | U795 HOME |
![]() PDF Version | Sitemap Manuals
PDF Version | Sitemap Manuals
User Manual
Stereo Limiter with analog Delay Line and dynamic Release Time Modulation U795
V700 Mastering Modules
Stereo Peak Limiter with Delay Home | V700 Mastering Home
The Stereo Limiter with Delay U795 is available in different versions. Custom control ranges for several controls are possible as well as different versions of the faceplate and the control knobs. The modules are available with electronically balanced and transformer balanced inputs and outputs.
For a general information on the module, please change over to the Stereo Peak Limiter with Delay Homepage
| Initial Settings | Quickstart | Options | FAQ's | |
|||
 |
Control Elements | Notes and Pecularities | |
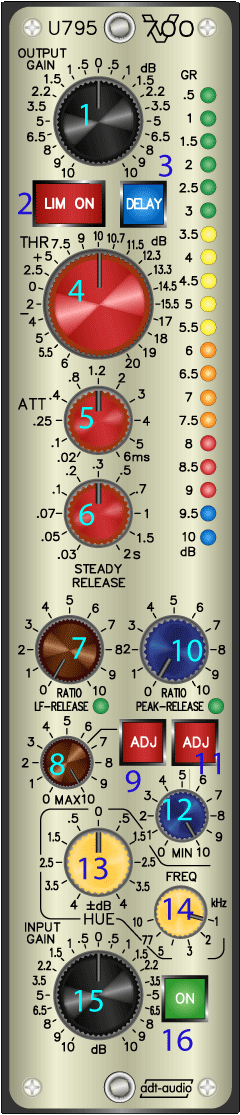
| 1 | Output Gain This control only sets the output level. It does not affect the limiter setting. |
Output gain allows precise adjustment of the level send to the a/d converter. | |
| 2 | LIM-ON activates Limiter If this switch is not pressed, the device operates as a simple amplifier. Output Gain (1) and Input Gain (15) are still active. |
This switch allows checking the effect of the limiter without altering the level setting. | |
| 3 | Delay (on) This switch inserts the analog delay line with a time shift of 35 µsec. The delay compensates the attack time of the limiter section entirely, if the attack control is set all the the left. Using the delay avoids any peaks above threshold. The DELAY (3) can be activated independent of the limiter. |
ATTENTION When the delay is activated, the device has a latency time of 35 µsec. This is not important for mastering applications; however, it must be considered when using the limiter during the mix in a sub group. |
|
| 4 | Threshold Controls the threshold in the range from - 6 dBr to + 20 dBr. The values refers to + 6 dBu = 0 dBr. The range around + 10 dBr is streched, since the nominal input level of most a/d converters are in that range. |
Custom ranges and laws are possible. | |
| 5 | Attack Controls the attack time in a range from 0.2 to 6 ms. When using the device as output peak limiter, this control has to be all to the left. All other settings make possible to use the device as a 'hard clip compressor'. |
The shortest attack time is entirely compensated by the analog delay line. | |
| 6 | Steady Release This is the main release control with a range from 30 ms to 2 sec. It controls the release time as long none of the release time modulation sections is active. See (7) and (10) for details. Standard setting is 0.3 sec |
||
| 7 | Ratio LF-Release A second control circuit determines the percentage of low frequency signal components that can cause distortion with fast, pump free release time settings. The computed control signal can increase the release time automatically, when low frequency signals appear at high levels. The position of the RATIO LF RELEASE control determines (7) how much the release time is increased in relation to the low frequency percentage. The LED changes the color from green to yellow when regulation occurs. The degree of regulation changes the color via orange to red. |
Descriptively speaking, a high level bass signal turns the steady release control (6) automatically to the right during the time the low frequency level is high and returns to the original position when the level drops. The setting of the Ratio-LF-Relase control determines how far the steady release (6) is turned to the right.
green - no regulation |
|
| 8 | LF-Release MAX This control limits the maximum release time that can occur using the Ratio LF Release control (7). Even if the setting of the LF-Ratio control (7) would cause a longer release time, it is blocked by the setting of the LF-Release MAX (8) control. |
The control lets you avoid overcompensation from the LF control circuit. The default position is all to the right. |
|
| 9 | ADJ switch, for the adjustment of the maximum release time under LF modulation, using (8) The switch applies a test signal to the control circuit, that simulates a 100 % bass signal. This test signal helps to set the maximum time. USED ONLY DURING ADJUSTMENT - DEFAULT POSITION IS OFF |
You don't need to check the mix for high level bass signals - pressing adjust produces the same effects as such a signal. | |
| 10 | Ratio Peak-Release A third control circuit checks the signal for short peaks above threshold. During a bass tone that increases the release time with the modulation, such a peak would cause regulation and therefore cause also audible pumping. The peak-release circuit can reduce the release time during the short peak signal to avoid this effect. Right after the peak, the release time returns to the original value, determined from the combination of the steady release control (6) and the LF modulation section (7 and 8). The Ratio Peak Release (10) controls the displacement of the release time caused by a peak. The LED changes color from green to yellow when regulation occurs. The degree of regulation changes the color via orange to red. Due to the fact that short peaks cause no meaningful display, a small hold time is applied to this led display that only affects the display but not the regulation. |
Descriptively speaking, a fast and short peak turns the steady release control (6) automatically to the left for the duration of the peak and returns to the original position right after the peak. The setting of the Ratio-Peak-Relase control determines how far the steady release (6) is turned to the left.
green - no regulation |
|
| 11 | ADJ switch, for the adjustment of the minimum release time under peak modulation, using (12) The switch applies a test signal to the control circuit, that simulates the maximum possible peak control signal. This test signal helps to set the maximum time. USED ONLY DURING ADJUSTMENT - DEFAULT POSITION IS OFF |
You don't need to check the mix for peaks - pressing adjust produces the same effects as such a signal. | |
| 12 | Peak-Release MIN This control limits the minimum release time that can occur using the Ratio Peak Release control (10). Even if the setting of the Peak-Ratio control (10) would cause a shorter release time, it is blocked by the setting of the Peak-Release MIN (12) control. |
||
| 13 | HUE Control is a side chain filter that can change the mid or high frequency response under regulation. The control allows adaption of the neutral sound characteristic in the 0 dB position. The frequency control (14) determines the shifts the curve of this shelving filter with a range of 4 dB. Boosting causes that the mid/high range causes more regulation, which results in less mid/high signals in the output signal, while cutting reduces the influence of these frequencies and causes boosting of the mid/high range in the audio signal. | Since the Hue filter alters the frequency response in the side chain of the limiter, minor influence on the threshold level is possible. | |
| 14 | Frequency Selector of the HUE Regler 6 steps from 1 kHz to 10 kHz determines the center frequency of the shelving curve (13) |
||
| 15 | Input Gain Allows to adapt the input level appropriately. This control ALTERS THE LIMITER THRESHOLD. |
Settin the input gain to - 5 dB has the same effect as turning the threshold contol 5 dB to the rgiht. | |
| 16 | The ON switch inserts the module Unless ON is pressed, the entire unit is hard-bypassed. The input is also switched and does not load the source signal. |
||
|
Initial Settings
1. Switch on the module using the ON switch (16) 2. Begin with Output Gain (1) and Input Gain (15) at 0 dB, or set these controls corresponding to values matching your needs. 3. Turn the Attack Control (5) all to the left 4. Set the Steady-Release control (6) to the center position (0.3 sec) 5. Turn the LF-Release Ratio Control (7) all to the left 6. Turn the Peak-Release Ratio Control (10) all to the left 7. Turn the LF-Release Max Control (8) all to the right. 8. Turn the Peak-Release Min Control (12) all to the right. 9. Set the HUE Control (13) to the 0 dB position. The position of the Frequency Selector (14) is only important if the HUE control is not in the 0 dB position. 10. Switch on the Delay, using switch (3) . 11. Activate the limiter with the LIM-ON switch (2) und start with a Threshold (4) setting of 10 dB. a) Use the Threshold Control (4), if necessary in combination with the Input Gain Control (15) to adjust 3 dB of Gain Reduction on the LED display. You can use the Input Gain Control (15) to shift the Threshold control (4) to a range with smaller steps (around 10 dB). b) Adapt the output level with the Output-Gain Control (1) to your a/d converter. c) Usually a gain reduction of 3 dB is not criticle and possible with almost all kinds of signals without audible side effects. d) Start with the fine trim of the Steady Release Control (6). Turn the pot to the right till you hear pumping. Find the point where the pumping dissappears by turning the control to the left. e) In most cases low frequency signals will be distorted after trimming the Steady Release Control (6). The reason for the distortion is the short release time that causes regulation within the period time of the bass signals. Usually the setting of the Steady Release Control (6) is a compromize between audible pumping and distortion that eventually limits the maximum gain reduction. The additional circuits of the U795 allow to find a better compromise: f) Turn the LF-Release Ratio Control (7) to the right and try to find a setting where the LF distortion disappears. Make sure that you don't overcompensate the distortion. If the control is more to the right than necessary for the compensation of the distortion, pumping right after heavy low frequency signals occurs. The LED displays the effect of this modulation. g) After finding the best position of the LF-Release Control (7), check the mix for heavy bass signals, far above the average. This might be a drum break or something similar. Check for pumping right after the massive bass sounds. If this occurs, the LF-Release Max Control (8) should be used to limit the maximum modulation to a values that avoids pumping. Either loop around the break or use the ADJ switch (9) to accomplish this setting. The ADJ switch (9) applies a test signal to the modulation circuit that is equal to a very high level bass signal. You can use this test signal to adjust the maximum release time instead of the mix. Make sure that the ADJ switch (9) is released after the setting. h) The LF-release modulation avoids low frequency distortion by increasing the release time while high level low frequency signals are present. If a short peak appears during such a bass signal, it can cause audible pumping due to the additional gain reduction caused by the peak, since the release time is still determined by the bass signal and above the pumping threshold. To avoid this effect, the peak modulation circuit can reduce the release time just for the short duration of the peak. The Peak Release Ratio (10) allows adjusting the influence of peaks on the release time. i) If peaks durings bass signals cause pumping, turn the Peak Release Ratio Control (10) to the right, until the pumping disappears. The LED displays this modulation. Make sure that the Peak Release Ratio Control (10) is set to the minimum possible position to compensate the pumping. If its to far to the right, the LF signal might be distorted for a short time right after the peak. j) Like with the LF-Release circuit, an additional control lets you limit the influence of the peak regulation to a fixed value. The Peak Release Min Control (12) can limit the minimum possible release time. This might be necessary, if very heavy peaks cause a regulation that drives down the release time into the distortion range. If this occurs, use the control to limit the range of the modulation until the disortion disappears. The ADJ (Adjust) Switch (11) applies a Test Signal to the circuit that is equal to the highest possible peak that the converter can handle. It might help you adjusting the minium time with the Peak Release Min Control (12). Make sure that you release the ADJ Switch (12) after the setting. k) The Hue-Filter lets you adapt the frequency response of the regulation to your taste or your needs. When the Hue Control (13) is in the center position (0 dB), the limiter has a neutral sound performance with and without regulation. There are no loss of high frequencies or any similar effects. The Hue Filter can alter this neutral behaviour in both directions; more or less mid / high frequency signals. The Hue filter has a shelving characteristic; the frequency is controlled by the stepper switch (14) with 6 positions in the range from 1 kHz to 10 kHz. Turning the Hue Control (14) to the right boosts mid/hi signals in the side chain, which results in a reduction of this frequency band in the audio path and vice versa. Control Ranges Inputs and Output Appearance Why are the settings for LF-Ratio Release and Peak Ratio Release different from title to title? Depending on the spectrum of the signal, the relation of low frequency signals and fast peaks to the total level, the control parameters of the modulation section are different. A mix with a high bass level will result in a control signal that is a lot higher than the control signal of an average mix. The situation of the peak control is quite similar. A soft mix with high reverb levels won't have that much peaks, while a transient-rich signal consists of almost only peaks. The necessary settings for the different controls depend not only on the signal itself but also on the audibility of negative side effects that cannot be calculated in any meaningful way. These effects result in different control signals from mix to mix and different necessary settings, appropriate to the actual signal. However, the control ranges of all controls are sufficient to cover all variants. Why does the Hue control affect the Threshold? If you have any questions or comments, please let us know. |
||
| V700 Index | Sitemap | V700 Manuals Index |